For every accomplishment on the exterior, another 2 things appear (or reappear) on the to-do horizon. . .
Continue reading
For every accomplishment on the exterior, another 2 things appear (or reappear) on the to-do horizon. . .
Continue readingThis week’s progress: a bathroom door, exterior trim (complete with nesting bird slowdowns), and a first-run of landscape design.
Continue reading
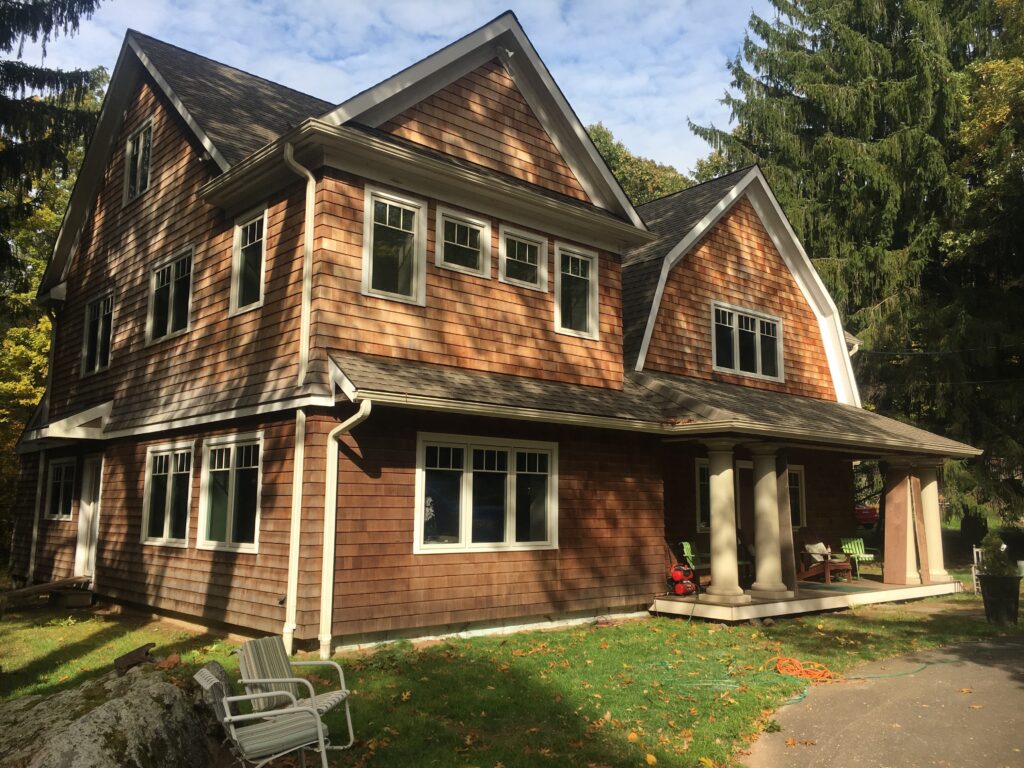
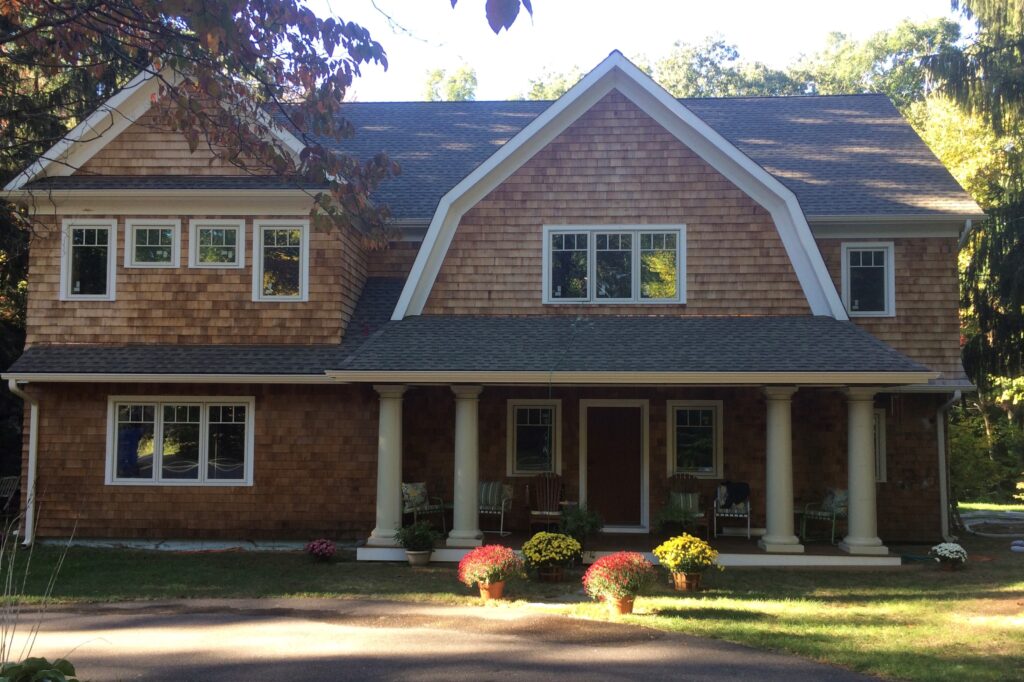
We’ve headed to the great outdoors – tackling the exterior finish work!
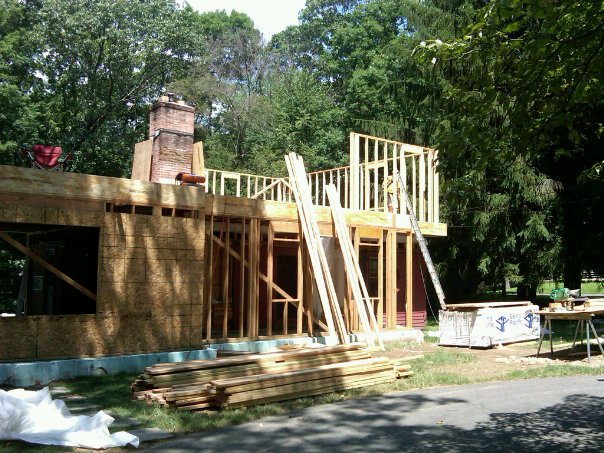
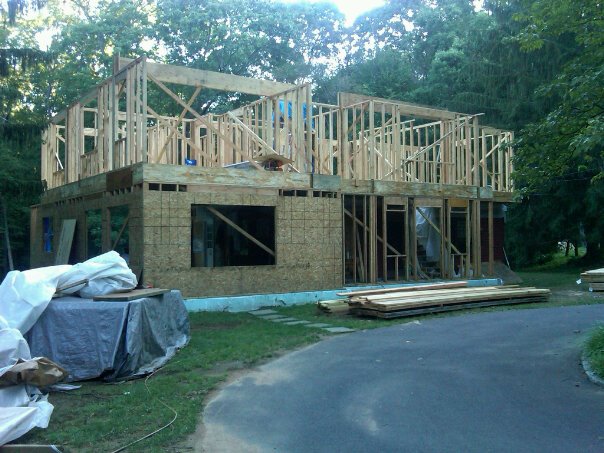
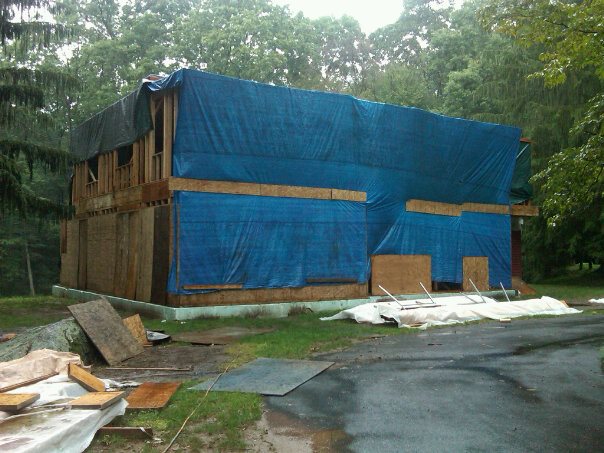
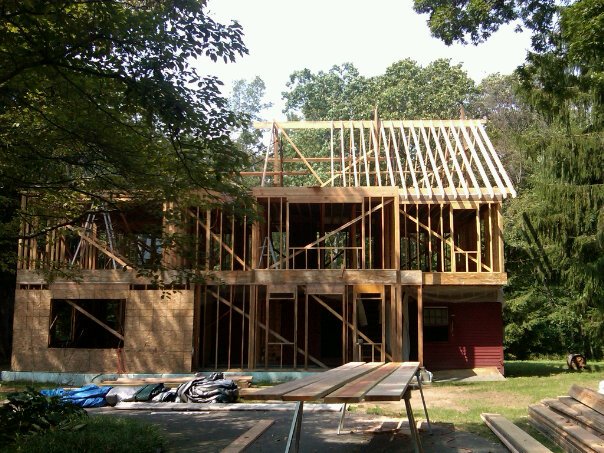
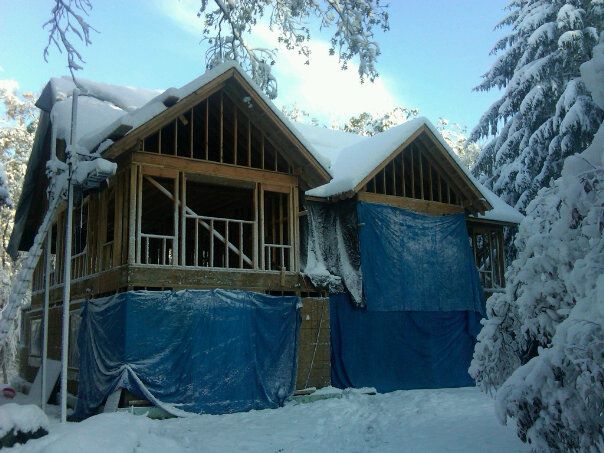
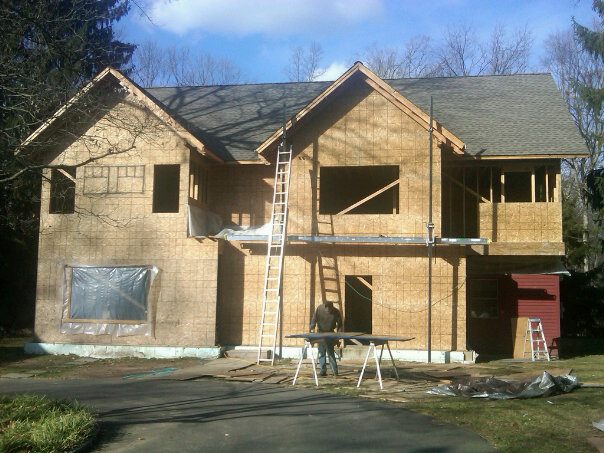
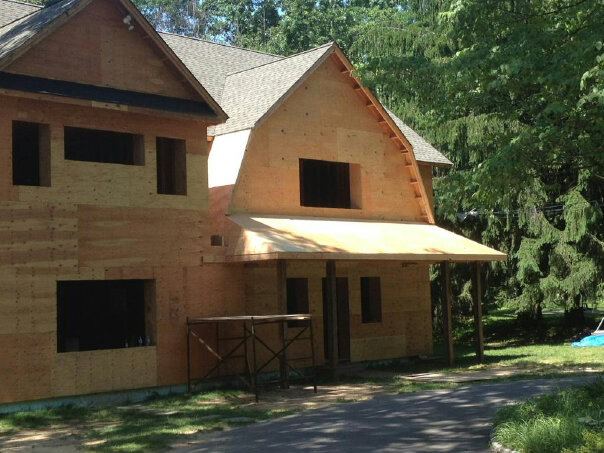
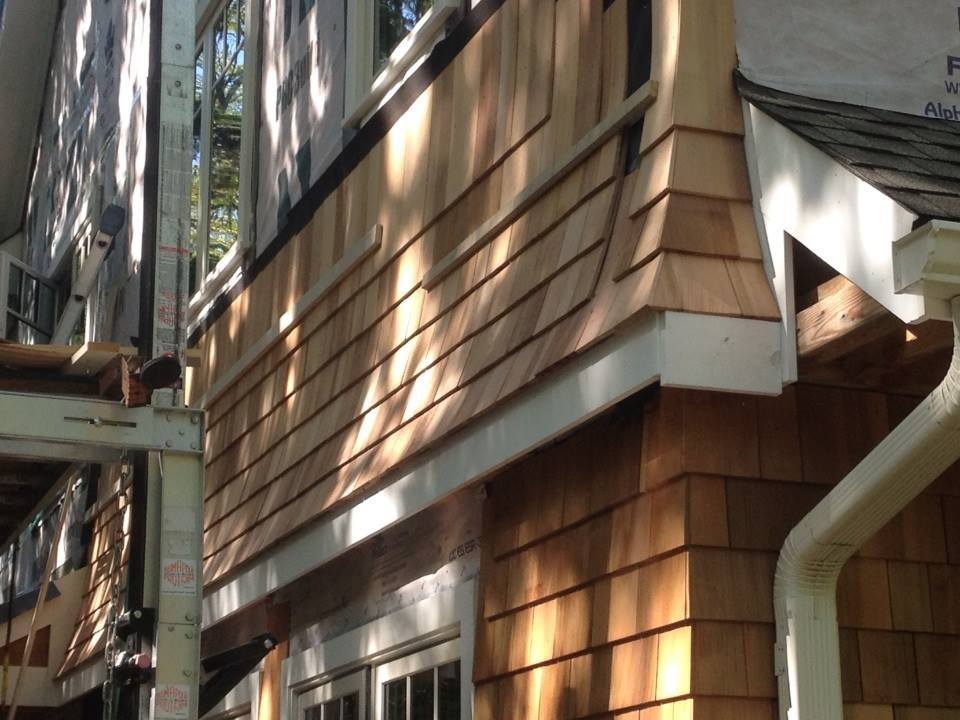
Continue readingI’m taking a bit of a sabbatical from Hump Day House stuff for the next couple of weeks. While I work on reviewing the first round of edits to the first draft of the book I’m writing about this adventure, I thought I’d share a few photos of “the bigger picture” to provide some scope, or maybe scale, to the adventure we’ve been on for the past 9 years.
If you’re a Gen-Xer, cue the tune for the theme from “The Odd Couple:” How can two grown adults (and 2 kids) survive a 9 year renovation without driving each other crazy?
Stay tuned. . . and meanwhile, enjoy a few visuals of the journey!


Normally I’m writing this blog perched at my desk with my view of that one stubborn backyard oak and the occasional visit from one of our friendly neighborhood birds of prey.* (The oak, by the way, has now given up the last of its dead, brown leaves and, in their wake, is throwing off gobs of catkins and curtains of yellow pollen. Welcome, Spring!)
This week, rather than enjoying that view, I’m sitting down at So-G, our local coffee roaster/hangout, sponging off their WiFi. That’s because this morning, while I had quickly popped down the hill with Tim to set my dad upright from where he’d fallen on my parents’ thickly carpeted bedroom floor (he was fine, and this is getting to be alarmingly routine), I got a group text from one of our neighbors asking if anyone else’s power was out. Of course we weren’t home and couldn’t say, but minutes later, we attempted to open the garage doors with the remote as we returned. When we were met with steadfastly closed doors, it was clear we were in the same boat.
*This week’s birds of prey sightings, as some of you may have seen on my Facebook and Instagram posts, included a particularly perseverant Barred Owl (who ended up with a baby bird for dinner) and a majestic, and very determined-looking Red-Tailed Hawk, who was clearly on a lunch hunt. Bummed I didn’t get any photos of that one.


Luckily, the coffee had been made 90 minutes before the outage, via the “program” function on the coffee machine, so I’m sitting at So-G, ironically not even drinking coffee, but enjoying one of their awesome, full-fat Greek yogurt, granola & strawberry parfaits – just exactly as if I’d made it myself at home. Not the worst way to be suffering a power outage.
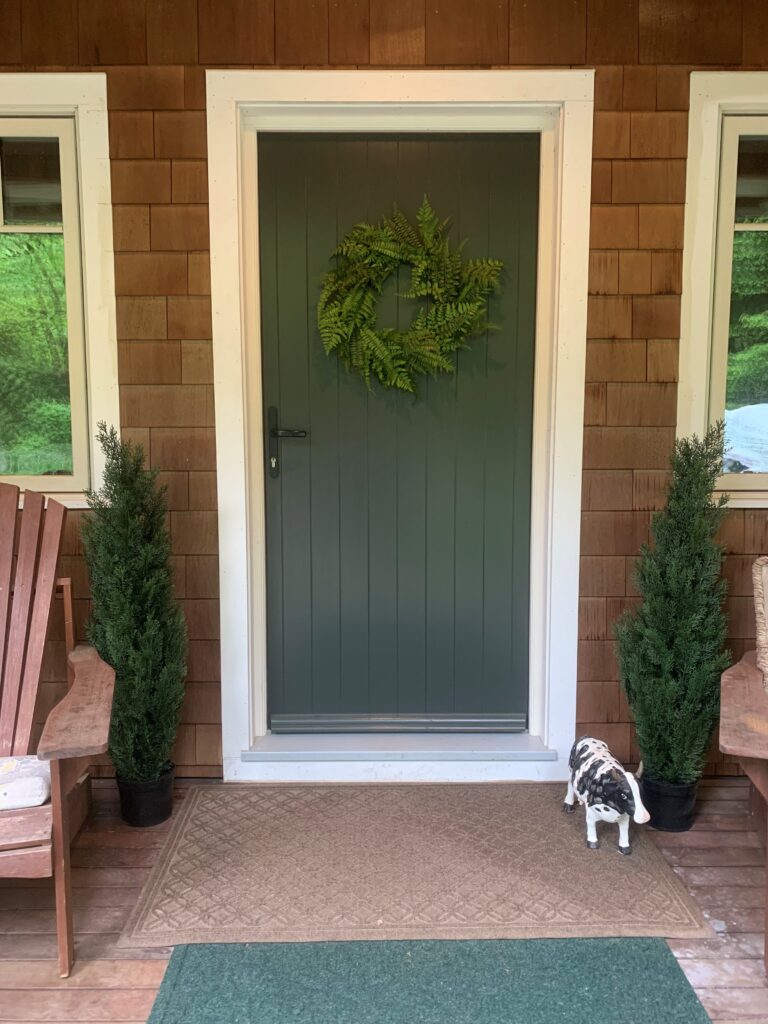
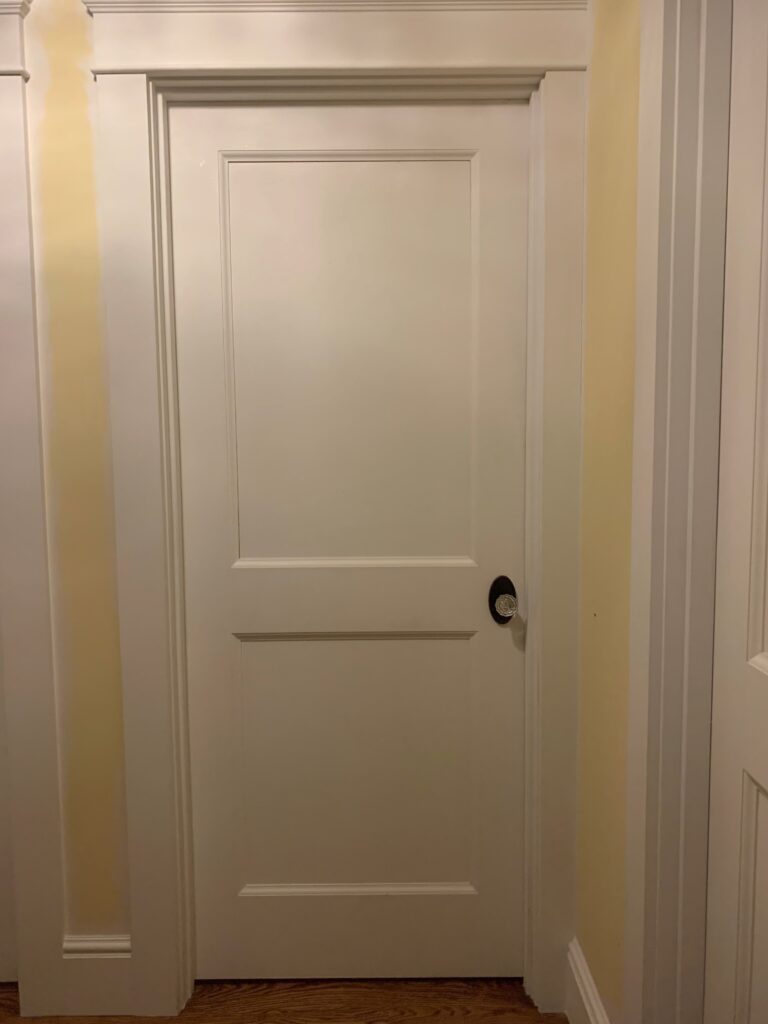
We made a lot of progress on the finish work this week, even if the bathroom door isn’t here yet. Sheetrocking, trim, painting, (even the front door!!) and electrical – all done.** There’s finally a switch again governing the ceiling light in the hallway so it isn’t on 24/7 because I’m too lazy every night before bed to unscrew the wire nut keeping it connected.
Even those pesky switchplate covers are now in place, which nearly always proves to be a short, but patience-challenging job (those infernal, tiny screws need to line up nearly perfectly in those infernal, tiny holes, and, as sure as I’m sitting here breathing, each screw gets dropped no fewer than 3 times, rolls across the floor and disappears – sometimes just for a few seconds, other times completely, seemingly sucked into a space-time wormhole, never to be found. I’m sure in some far reach of the universe, some poor alien guy keeps getting hit in the head by tiny screws falling out of the sky. I doubt, however, he’s cursing as loudly about it as Tim is here).


**Except for the filling of the nail holes on one piece of trim that I’m about to describe; and the final coat of paint on that piece of trim; and the final touch-up of the paint all around the bathroom door opening, which was a bit compromised by the painting of the trim; and a new round of touch up on the wall paint around the upper part of the door opening, thanks to that same new piece of trim; and a re-sweat of one of the plumbing joints behind the shower valve that stubbornly persists in dripping . . . See why this whole house project has taken 9 years??


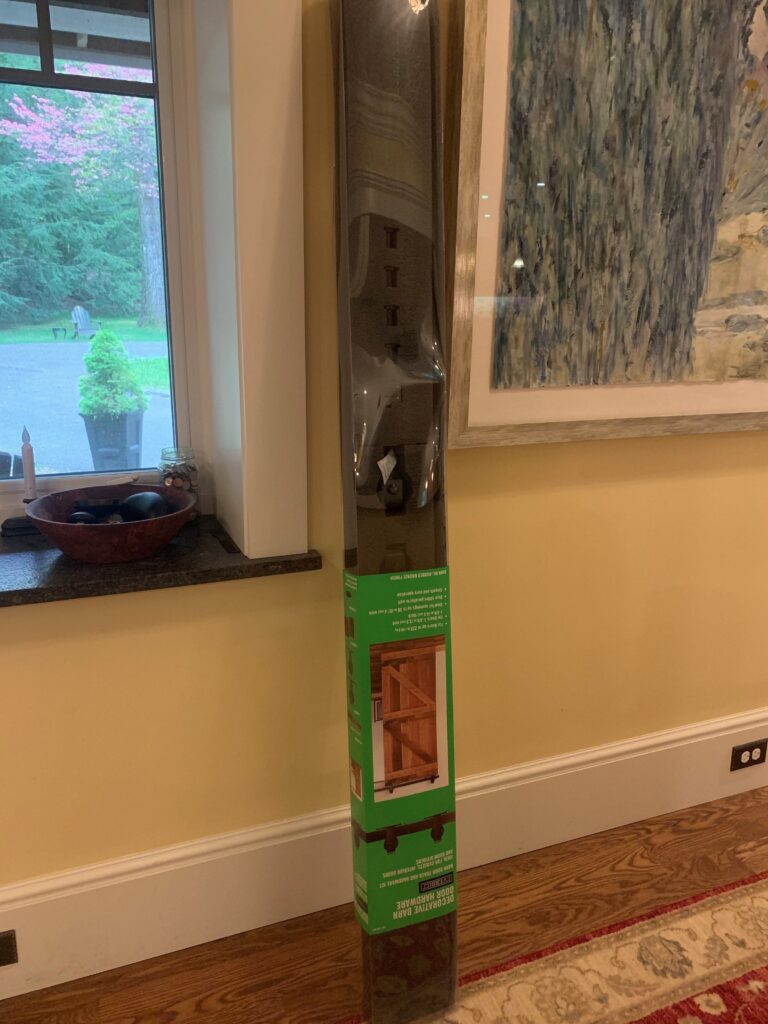
Yesterday Tim worked on installing the hanging hardware for the barn-style sliding door. He began that process on Friday, but the lack of a stud where we needed one behind the wall precipitated the hanging of a nailer (this is the new piece of trim I alluded to above). That meant extra work: ripping one down from the extra trim stock we have, sanding, it, priming it, hanging it, filling the nail holes, sanding again, and painting it – not a huge time commitment, but enough to make an excellent excuse to call a moratorium on all work for the week by early Friday afternoon.
Of course there’s always an unforeseen complication, and it’s never discovered in the early part of installation, so when he got back to it yesterday and had made it all the way to the stage of testing the slide action of the “dummy” door (one of the cheapos we used upstairs temporarily a couple of years ago before the real doors arrived so we could get our Certificate of Occupancy), we found a couple of issues that required the whole thing, including the nailer, to come down again. And now we have no power, so. . . dump run!
Power came back on around 10:00 a.m. Issues with nailer and hardware were fully resolved, and the temporary, dummy door is in place, warming up for the real door, whenever it arrives.


With that effort under the bridge, and a perfect, breezy, pollen-filled spring day in full bloom, we dedicated the rest of the day to . . . yardwork. Everything looks trimmed and tidy: even the driveway, front walk, and front porch are clean and free of oak catkins, which have been piling up like lumpy golden-brown snowdrifts for the past several days. So, I think I’m going to venture outside now to listen to the evening birdsong and enjoy my catkin-free driveway view, because by tomorrow morning, like all the rest of the work around here, they’ll be back.


I do believe I’ve discovered something that’s more excruciating than watching paint dry, and that is: watching sheet rock compound dry.
We got back from North Carolina early on Friday morning last week, after a 17-hour travel day (I drove. The whole way. Which was fine. Except for the speeding ticket in Durham. And the part where I almost rear-ended another car at 60+ mph coming off the Delaware Memorial Bridge because I was trying to figure out if there was a toll and my eyes were up and looking for a toll gantry, and not on the guy slamming on his brakes in front of me as a box blew across the highway in front of him). We left Black Mountain at 7:45 a.m. last Thursday, and arrived home at 12:45 a.m. on Friday, remarkably unscathed, but exhausted.
Therefore (!?) no work on the downstairs hallway began until Monday of this week, and not a whole lot happened Monday. Tim made a call to the supply house about the door for the bathroom; a couple of pieces of trim went up; and that was about it. Yep. I’m cranky.
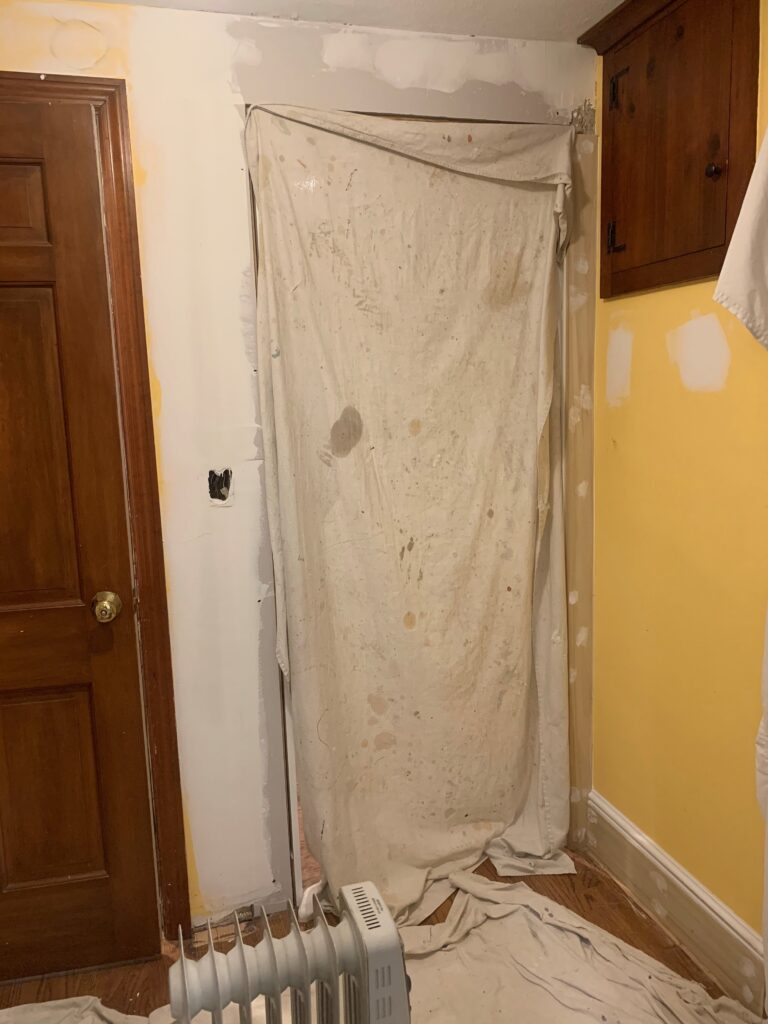
Things picked up more today: this morning we heard back from the supply house with the price for the bathroom door and we finally placed the order. They say it should be here in a week. I hope they’re right. The sheet rock around the doorway between the hall and the dining room was also hung today, and 2 coats of tape/compound applied, at long last obliterating the final bit of visible structural skeleton in the house. I should throw a party. We have our old friend the plug-in fin heater cranking in the hallway, consuming untold kilowatts, to make sure the compound dries as expeditiously as possible. We also procured the hanging hardware for the “barn door” approach we’re taking, but the handles/pulls and locking mechanism have yet to be identified. The hanging hardware is standing on its end in the foyer, awaiting its implementation.
After I spent several hours yesterday trying to find the right pull & locking solution(s), we concluded that we should hang the door first to see what kind of clearance, if any, the door has as it slides past the wall, so we know how much projection the handle/pull on the inside can have – likely not anything more than 1/4.” And I’m not very excited about a simple recessed pull for the inside of the door (this won’t be a lightweight door, and for someone elderly with diminished strength in their hands/arms, something like that could prove difficult to use). I feel like a handle of some sort is much more user-friendly, but there isn’t a lot of recessed folding-handle hardware out there. (*Note to my inner designer/inventor.)
I’m told that the hall will be painted tomorrow. That would require all the taping/sanding to be complete. I think it’ll be just a little bit of a miracle if that’s the case, but if it isn’t tomorrow, it should be Thursday. I can live with that. But, as ever, there’s so much more to what little appears to remain: the hanging hardware for the door needs to be installed – possibly this week – but the door needs to show up before it can be hung, which won’t be until at least next week. Then we have to figure out the pulls, and the lock, and install those. The hall-facing pull/handle should be straightforward. The inside pull, and the lock? Don’t lay any odds down on the duration of those.
Meanwhile, I think during one of the lulls, we might, finally, be painting the front door. Once all of that is done, it’s on to the finish trim outside, and to the looming beast of landscaping. I’m hoping against hope that we have a design for that in the next month or so, which would allow a feeble prayer of the work getting done this year. Though if it slips into next year there is something appealing (in a slightly masochistic way) about being able to say this renovation took a decade. . .!
We’re on a short hiatus this week, down in the mountains of western NC, picking Owen up from his freshman year in college. It’s so incredibly beautiful and peaceful here, so far from the dust and decisions of working on the house. I’ve been looking forward to this trip, along with some Blue Ridge hiking for months (I’m typing this on the back porch of the house we’re renting, listening to a symphony of birdsong, led most vocally by 2 male cardinals who are clearly drawing the battle lines around their spring conquest). Thankfully the weather is cooperating, though truthfully, I brought my rain gear because I wasn’t going to let the opportunity to hike these mountains pass if Mother Nature decided on 4 more days of precipitation. I’m hoping for everyone back home that the sunny weather we had here yesterday and, so far, this morning, is gracing them as well, because it has been so incredibly rainy for the past several weeks at home that people are starting to lose their shit.
But, since this is a page dedicated to what’s going on with the renovation, an update: aside from a GFI outlet (and switchplate cover), one or two last pesky plumbing joints to tighten up, and, oh yeah, the door (which means the hallway also has to be finished – a small task I’d all but forgotten needed doing) the bathroom is DONE!! I’ll share the photos in a minute, after I explain how I could have forgotten about the hallway, or why *that* has to be done before we can call the bathroom done.
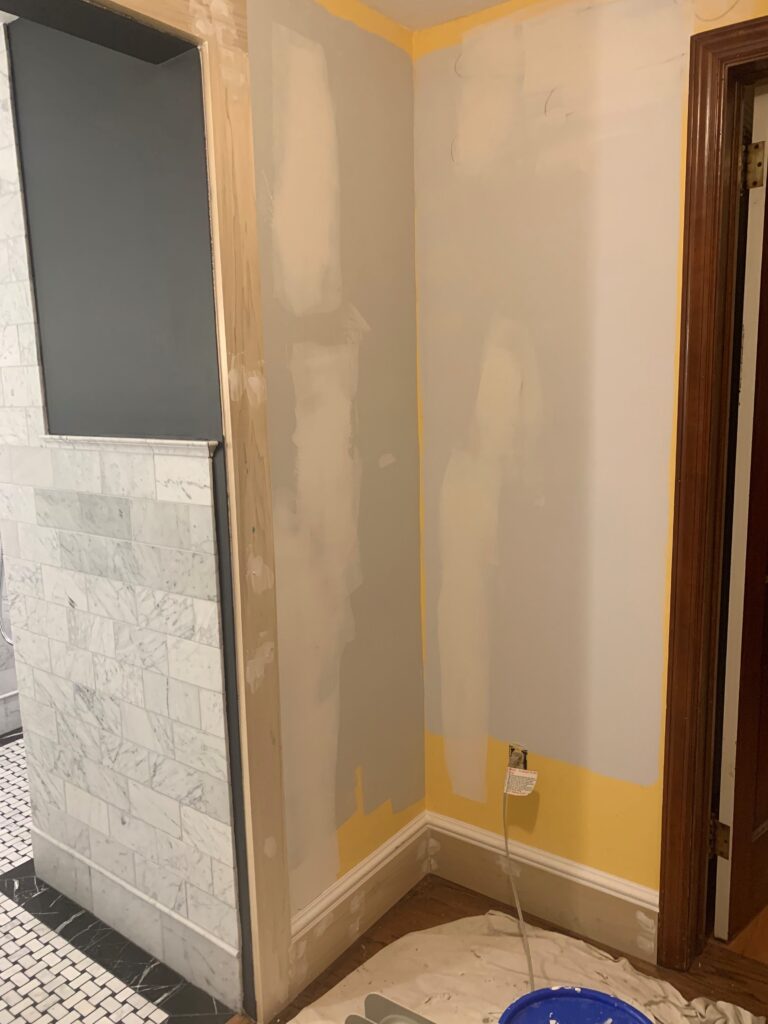
So first, what does the hallway have to do with the bathroom? Since you asked (ha 😉), I’ll tell you. When we changed the bathroom doorway and made it wider, we had to remove the entire frame (and trim, inside and out) of the previous doorway (recall the
Dr. Jekyll & Mr. Hyde intro from several weeks back). I’d like to say that was the only factor that began the cascade of re-doing the hallway, but in reality, that began at least a year ago – maybe more, but neither of us can remember the point at which the hallway went from finished to unfinished. All I know is that the doorway from the dining room into the hallway was similarly taken apart and, looking at it, it appears that we added some structural 2 x 4’s around the door frame. However, they’ve been flanking the hall-side of that opening, exposed like the cutaway view of bones in an anatomical model, for so long that they’ve become invisible to us, and clearly those 2 x 4’s are too new to have been there since the original house was built.
I think there must be a condition – I’ll call it “Renovator’s Amnesia,” which kicks in as a form of emotional self-preservation when a renovation project hits flood stage, flows over its banks, and messes up parts of your house you never really anticipated it would; and the project, which you thought would take “x” amount of time, grows and morphs into something with a life and a personality all its own as it approaches “x-squared.” You no longer remember all the details, or when you did what, or even why. You’re just happy when you can call something – anything – “done.” Thus it is with that hallway: I’m so used to it in its partially-torn-apart state that when Tim asked me last week what color I wanted to paint it, I was taken entirely by surprise.
Back to the bathroom door: the hallway side of it needs new trim (which also needs to be painted) before we can hang the hardware for the barn-style sliding door (and the actual door itself, which cannot be hung until it’s ordered. I will now go inside and remind Tim that we need to do this, though it probably won’t happen now because for some reason he’s vacillating on the style of the door, meaning that it could actually be weeks longer before this project is finally, fully complete. Sigh). Further, because that doorway needs new trim, the trim in the entire hallway needs to be torn out and replaced. That’s because the style of the old trim is so completely different than the style of the trim in the rest of the house (see what I mean by “cascade?”). To be fair, he actually did put up the new trim around both the bathroom doorway and the doorway into my office, plus the baseboard on 2 of the hallway walls, Saturday afternoon. He even humored me and put up samples of the 3 possible paint colors I picked up late last week.
Meanwhile, though, I’m thrilled with how this bathroom turned out, even if no one will use it until it has a door.


It’s Tuesday afternoon, just past 3pm, and I am self-medicating with a glass of rose to the sounds of Mr. Hyde and the Torch-tones (that would be the plumbing torch).
Continue readingA few weeks ago in the post I dubbed “The Call of the Wild,” I mentioned the black border I had planned around the perimeter of the bathroom floor. At that time, and in the weeks leading up to it, it would be fair to characterize Tim’s enthusiasm level for my vision as maybe a “2” on a 10-point scale: “tap cold,” though admittedly not quite a “fresh-out-of-the-fridge-dispenser-1,” or, a “solid-ice-0.”
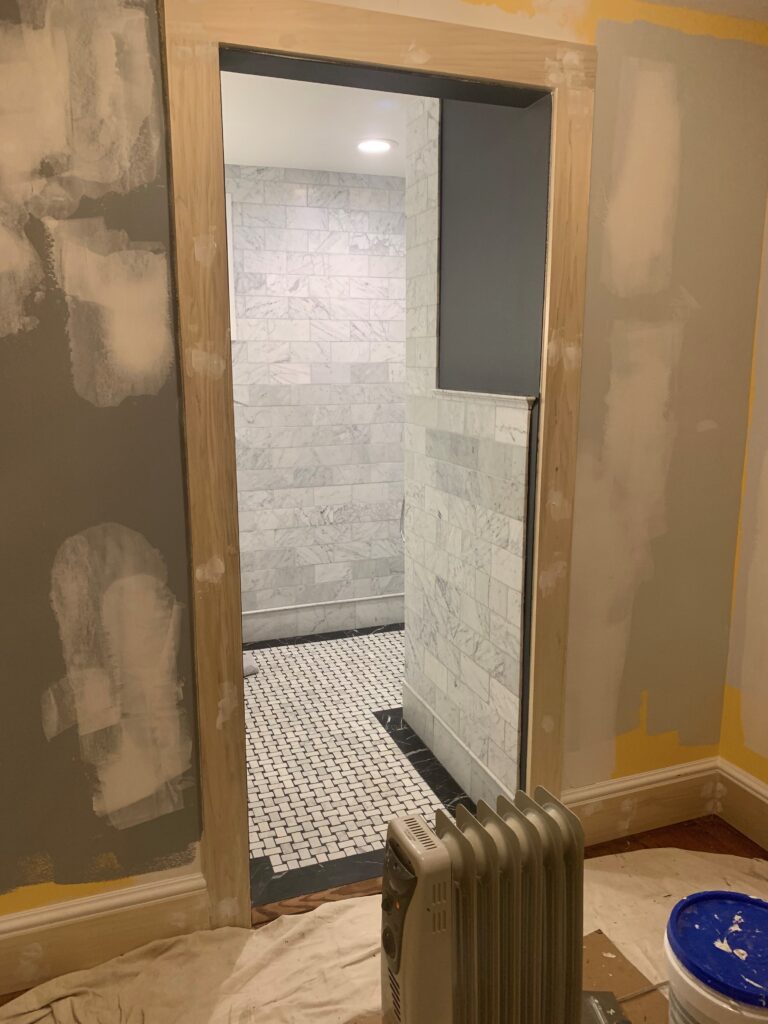
In the intervening time, he’s finished up the rather extensive job of tiling the walls: 3 of them, including the longest one in the room, are tiled almost floor-to-ceiling with 4 x 8” Carrara marble. “Almost,” because anchoring the entire perimeter of the walls, in the first row along the floor, are larger 6 x 12” Carrara tiles, topped by half-round “pencil” molding, to form a baseboard. He also did a lovely job on a soap and shampoo niche in the shower, finished with the same pencil molding, which has a shelf. It’s set so the lower portion is accessible to someone who might be showering while seated, and the upper portion will be the right height for someone standing.
I’m trying to make this bathroom all about accessibility (though my grab bars still haven’t arrived). The concept of accessibility was the first of several battles we fought over the plan for this room, but a few key skirmishes cascaded from my audacious accessibility plan: widening the doorway; having a roll-in shower (which came along with its own set of special challenges); making the shower head a height-adjustable, removable, hand-held on a vertical bar.
As Tim rolled into the homestretch on the wall tiling, though, he abruptly changed his tune about my crazy notion of the black marble tiles around the border of the floor. He was actually excited about it, and, while I was slightly mystified, that didn’t stop me from pointing out that a few weeks earlier, he’d thought this was the stupidest idea ever. Suddenly now, he thought this was going to look really cool. (Um, yeah . . . that’s why I wanted to do it?) Go figure.
All good, because we were more or less roped into it at this point anyway, with him having laid down the rest of the “field” tile for the floor weeks earlier, leaving an empty space around the perimeter which would now be impossible to handle in any way other than, well, installing a border. I guess we could have used the 6 x 12” Carrara tiles as the border pieces, but I also had 2 boxes of that black marble, called “Nero Marquina,” sitting here waiting, and they were special-order, so there was no returning them. (I didn’t tell him that part).
So, last Tuesday, he began cutting the border tiles, which were also 6 x 12,” to dry-fit them into place. The border isn’t fully 6,” so there was a lot of cutting to do, and, as I’d done with the ribbon board around our front porch several years ago, I insisted on mitered corners – a small detail (and another thing we initially argued over), but one that would matter in the end, even though there would be 8 of them to deal with in this room (2 extra because of the shower, and 2 more extra due to a little jog on the left side of the doorway).
The field tile on the rest of the floor has a black and white basket weave pattern – the same floor tile we used in our master bathroom. I had decided on black grout this time, both because it wouldn’t discolor under traffic, and because it would make the basket weave pattern pop. Tim’s experience told him that he wanted to cut the perimeter edges of those tiles in such a way that only white tiles were at the edges, making for a clean line around the entire border. That was fine, but it meant that the size of the border would vary slightly around the room – there was no way to lay the field tile in such a way that the border would be exactly even around the entire room (unless we’d built the room to fit around the tile, which was not only silly, but impossible). With that, every border tile had to be cut to size for its own individual spot. Tim labeled them as he cut and confirmed their fit. Every complementary angle at the miters was also unique, and I don’t think a single one of them was the typical 45-degrees you’d expect at a mitered corner.
With all the cutting and fitting complete, we had one more hurdle to jump: the Nero Marquina tile was *slightly* thicker than the basket weave field tile, so we had to figure that out. Having a little edge sticking up around the entire perimeter, *especially* at the doorway, would be a problem – an open invitation for chipping. At first Tim thought he’d be able to pitch the thinset inward, making it slightly thicker/deeper at the walls, and angling the border tiles down to where they met the basket weave tiles. The theory proved better than the reality though, so that idea was abandoned after 2 or 3 tiles. The only option remaining wasn’t pleasant: grinding the tiles down to the right thickness. Hours of work ensued, but finally, every tile fit the way it needed to, and, just yesterday, in they went.
Tim spent today working on the sheetrock, smoothing the walls and ceiling, cutting and installing the window trim, and touching up the grout on the walls. Now that he has his sheetrocking stuff out, he’s going to hang the little bit of it that’s been missing around the doorway from the hall into the dining room. Neither one of us knows *how* long that’s been showing its skeleton of studs and header, but we’ve gotten so used to it that it will probably look really weird when it’s finished. I’m so accustomed to that hallway being partially torn up, in fact, that I was shocked today when Tim asked me what color I wanted to paint those walls. I had completely forgotten about those. Back down to mom’s to (re)borrow my Benjamin Moore paint fan.
The floors will need to be cleaned (of course) and sealed (maybe not-so-obvious) before grouting, to prevent the black grout from staining the Carrara in the basket weave tile. That might happen tomorrow. Then the walls will get their paint. Maybe, just maybe, by Hump Day next week, we’ll actually be installing fixtures.
I figured I’d break things up a little bit this week so it’s not just bathroom, bathroom, bathroom (I’ll get back to that though, I promise. As I’m typing, we’re all done with the wall tiling and Tim is now cutting and dry-fitting the floor border. It’s exciting)!
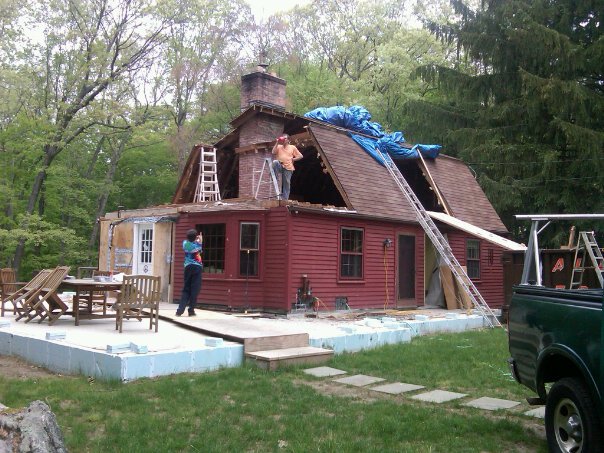
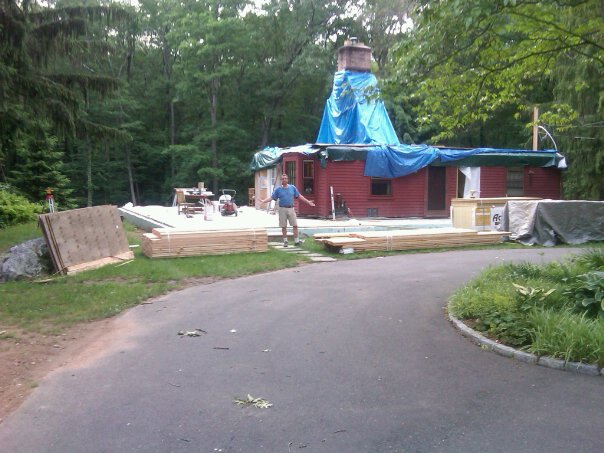
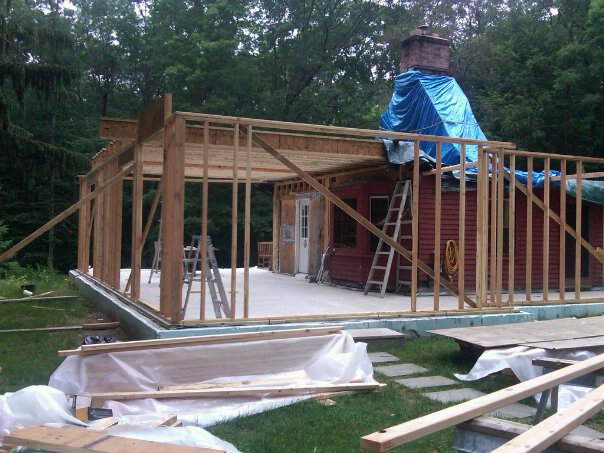
For this week’s entry, though, I’m going to roll it back for some historical (and structural) perspective. When we first started thinking about and planning this project (like, more than a decade ago) we knew we’d want to make the house as energy-efficient as possible; that much was a given. While it was absolutely adorable, the prior incarnation of this place was the home-energy-equivalent of a miltary tank, where “efficiency” might be more effectively measured in “gallons/mile” than the reverse. Here, I swore if I ventured to the cold basement and stood in front of our oil tank in February, I could practically watch the gauge dropping as the furnace ran. Built in the early 1950s, the house may have been as solid as the rock that surrounds it (and that you can’t help but find anytime you try to sink a shovel into the ground around here), but it was so poorly insulated and air-permeable that you could practically see the curtains move when the wind blew at anything more than breeze level.
Tim, having been a subscriber for a couple of decades to “Fine Homebuilding” magazine, had followed energy-efficient building techniques through that publication for years. He’d been dreaming of employing those techniques on his own house for as long as I knew him. Whatever we did here, it was going to be something that went well-beyond standard building practices.
I first became aware of the European “Passivhaus” standard sometime in 2008. It was winter. There was an article in the Sunday New York Times magazine about it, and, after reading it, Tim declared that *this* was what we were going to do. I read the article with fascination, especially one specific example that has remained with me ever since, of a home out in Idaho that was built to the standard. There was no central heating system (I’ll explain that seeming insanity in a minute). The owners went away for several weeks in the middle of winter, and when they returned, the temperature in the house had dropped only into the 50’s. With no heat. For anyone who lives in a cold winter climate, that is truly remarkable.
You can read more about the standard and its history here, but here’s my quick interpretation of how and why it works: the primary principle is one of air-tightness, combined with super-insulation, sort of the same way a Thermos (or, these days, maybe a Yeti?) works. You put something nice and hot, or nice and cold, into something that’s airtight and super-insulated, and it retains its temperature for a very long time. Much of heat and cooling loss in typical homes happens because of air leaks and what’s known as “thermal breaks.” If you can eliminate, or radically reduce those things, you’re way ahead of the game. Don’t panic about the air-tightness – that’s well-addressed.
Back to the idea of how you can get by with no central heating system: the reality is that if you do this correctly, the heat of simply living (appliances such as your refrigerator, cooktop, oven, iron, dishwasher, etc, throw off heat; bodies throw off heat; showering and bathing throw off heat) is nearly, if not completely enough, depending upon some other factors, like whether you can build to take advantage of passive solar.
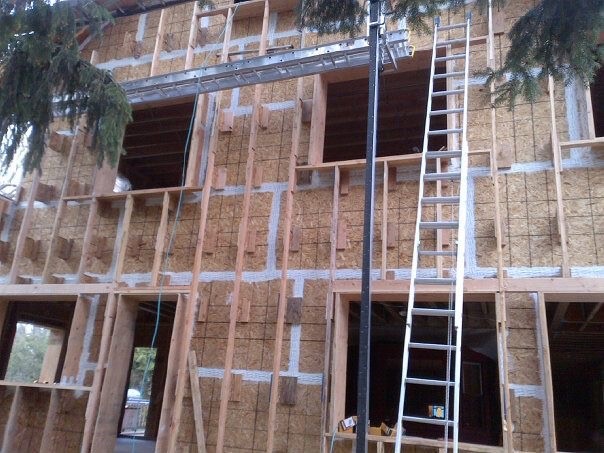
We did a lot of work “under the covers” to ensure we were airtight (including utilizing copious amounts of a special tape made in Europe specifically for air-sealing at every single seam of plywood, around the windows, and doors; installing windows and doors that met air-tightness standards from Canada and Ireland, respectively). We built with a double-wall construction technique that allowed for a full “envelope” around the structure, which was then filled with dense-pack cellulose insulation, meaning not only would we stay toasty warm (or blissfully cool, depending on the season), but also that we’d have the most epic windowsills ever (15” deep!). So if you’ve noticed the deep windowsills in photos, that’s why.
We did end up meeting the airtightness part of the standard (a day of nail-biting anxiety and then, elation); closely followed by installation of the air-exchange system (which came from Germany). The energy usage part is evolving (solar not yet installed), but suffice it to say that for now, our costs to heat (and light) the entirety of the house, including the basement (so about 3300 square feet) is a little less than what we were spending to heat and light the original house, which was about half the size. Solar should pay for itself in 5 – 7 years once we do install it.
So I don’t think we’ve met the full standard yet, but even if we don’t, we’ve definitely achieved Tim’s dream, and built not just a house, but a trove of knowledge on energy-efficient home building.
Happy Hump-Day, and if you like what you’re reading here, let me know: like it, comment if you’d like, and follow me on the Hump-Day House Stuff page of my WordPress site!!